When working on precise projects, knowing how to read 1/16 on a tape measure is essential. This smallest common marking allows accurate measurements in carpentry, construction, crafting, and home repairs. Each inch is divided into 16 equal parts, making it possible to measure down to 1/16 of an inch.
Moreover, mastering 1/16 on a tape measure improves project outcomes. It reduces errors in cutting, fitting, and assembly. Whether you’re building a shelf or installing tile, precision matters. That’s why understanding these tiny lines can make a big difference.
 Why Precision Matters in Measuring and Cutting
Accurate measuring prevents costly mistakes. A cut that’s off by just 1/16 of an inch may seem small. However, when repeated across multiple joints, the error adds up. This leads to gaps, misalignment, or ill-fitting parts.
For example, cabinet doors must align perfectly. If each frame is slightly too wide or narrow, the result looks unprofessional. Using 1/16 on a tape measure ensures each dimension matches exactly.
Similarly, flooring installers rely on fine markings. Planks need tight seams. Gaps from inaccurate cuts become visible over time. Reading 1/16-inch increments helps avoid this.
Woodworkers also depend on precision. Dovetail joints and miters require exact angles and lengths. Even slight deviations weaken the structure.
In metalworking, tolerance is even tighter. Some jobs allow only 1/32 of an inch variation. Starting with 1/16 accuracy builds good habits.
Painters use it too. Measuring trim, baseboards, or crown molding requires careful attention. Uneven edges look sloppy.
Ultimately, precision reflects skill and care. Learning 1/16 on a tape measure shows commitment to quality work.
How Small Errors Lead to Big Problems
A mistake of 1/16 might not matter in rough framing. But in finish work, it becomes obvious. Baseboards that don’t meet at corners create gaps. These are hard to fix without re-cutting.
Doors that bind often stem from uneven jambs. A measurement error of just two 1/16 marks throws off alignment. The door rubs instead of closing smoothly.
Tile layouts suffer too. If grout lines vary due to miscalculations, the floor looks crooked. Symmetry is lost.
Furniture makers face similar issues. Drawers that don’t slide properly may be due to incorrect side panel lengths. A few fractions add up.
Even in sewing or quilting, 1/16 counts. Quilters cut fabric with rulers marked in sixteenths. Misalignment ruins patterns.
Model builders need extreme accuracy. Miniature pieces fit tightly. A tiny excess makes parts unworkable.
Thus, learning 1/16 on a tape measure builds confidence. It prepares users for tasks where perfection matters.
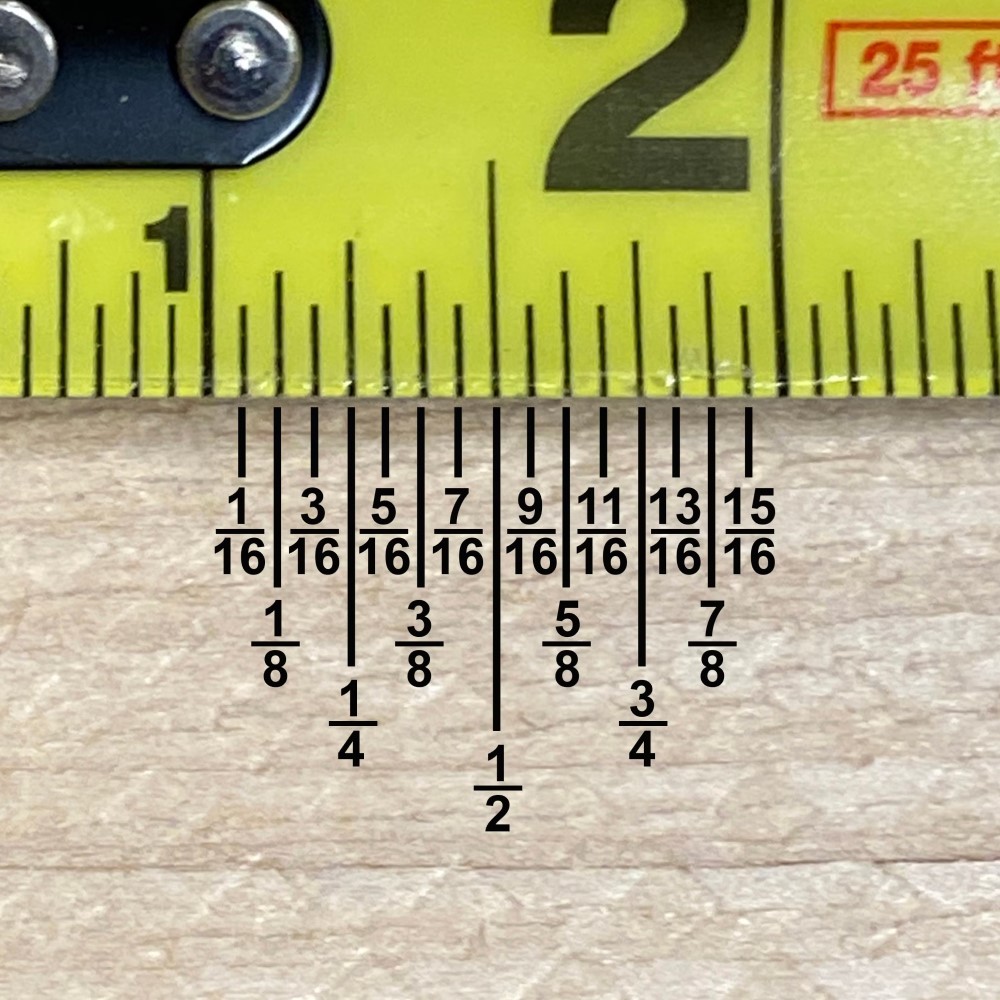
 How to Read 1/16 on a Tape Measure Step by Step
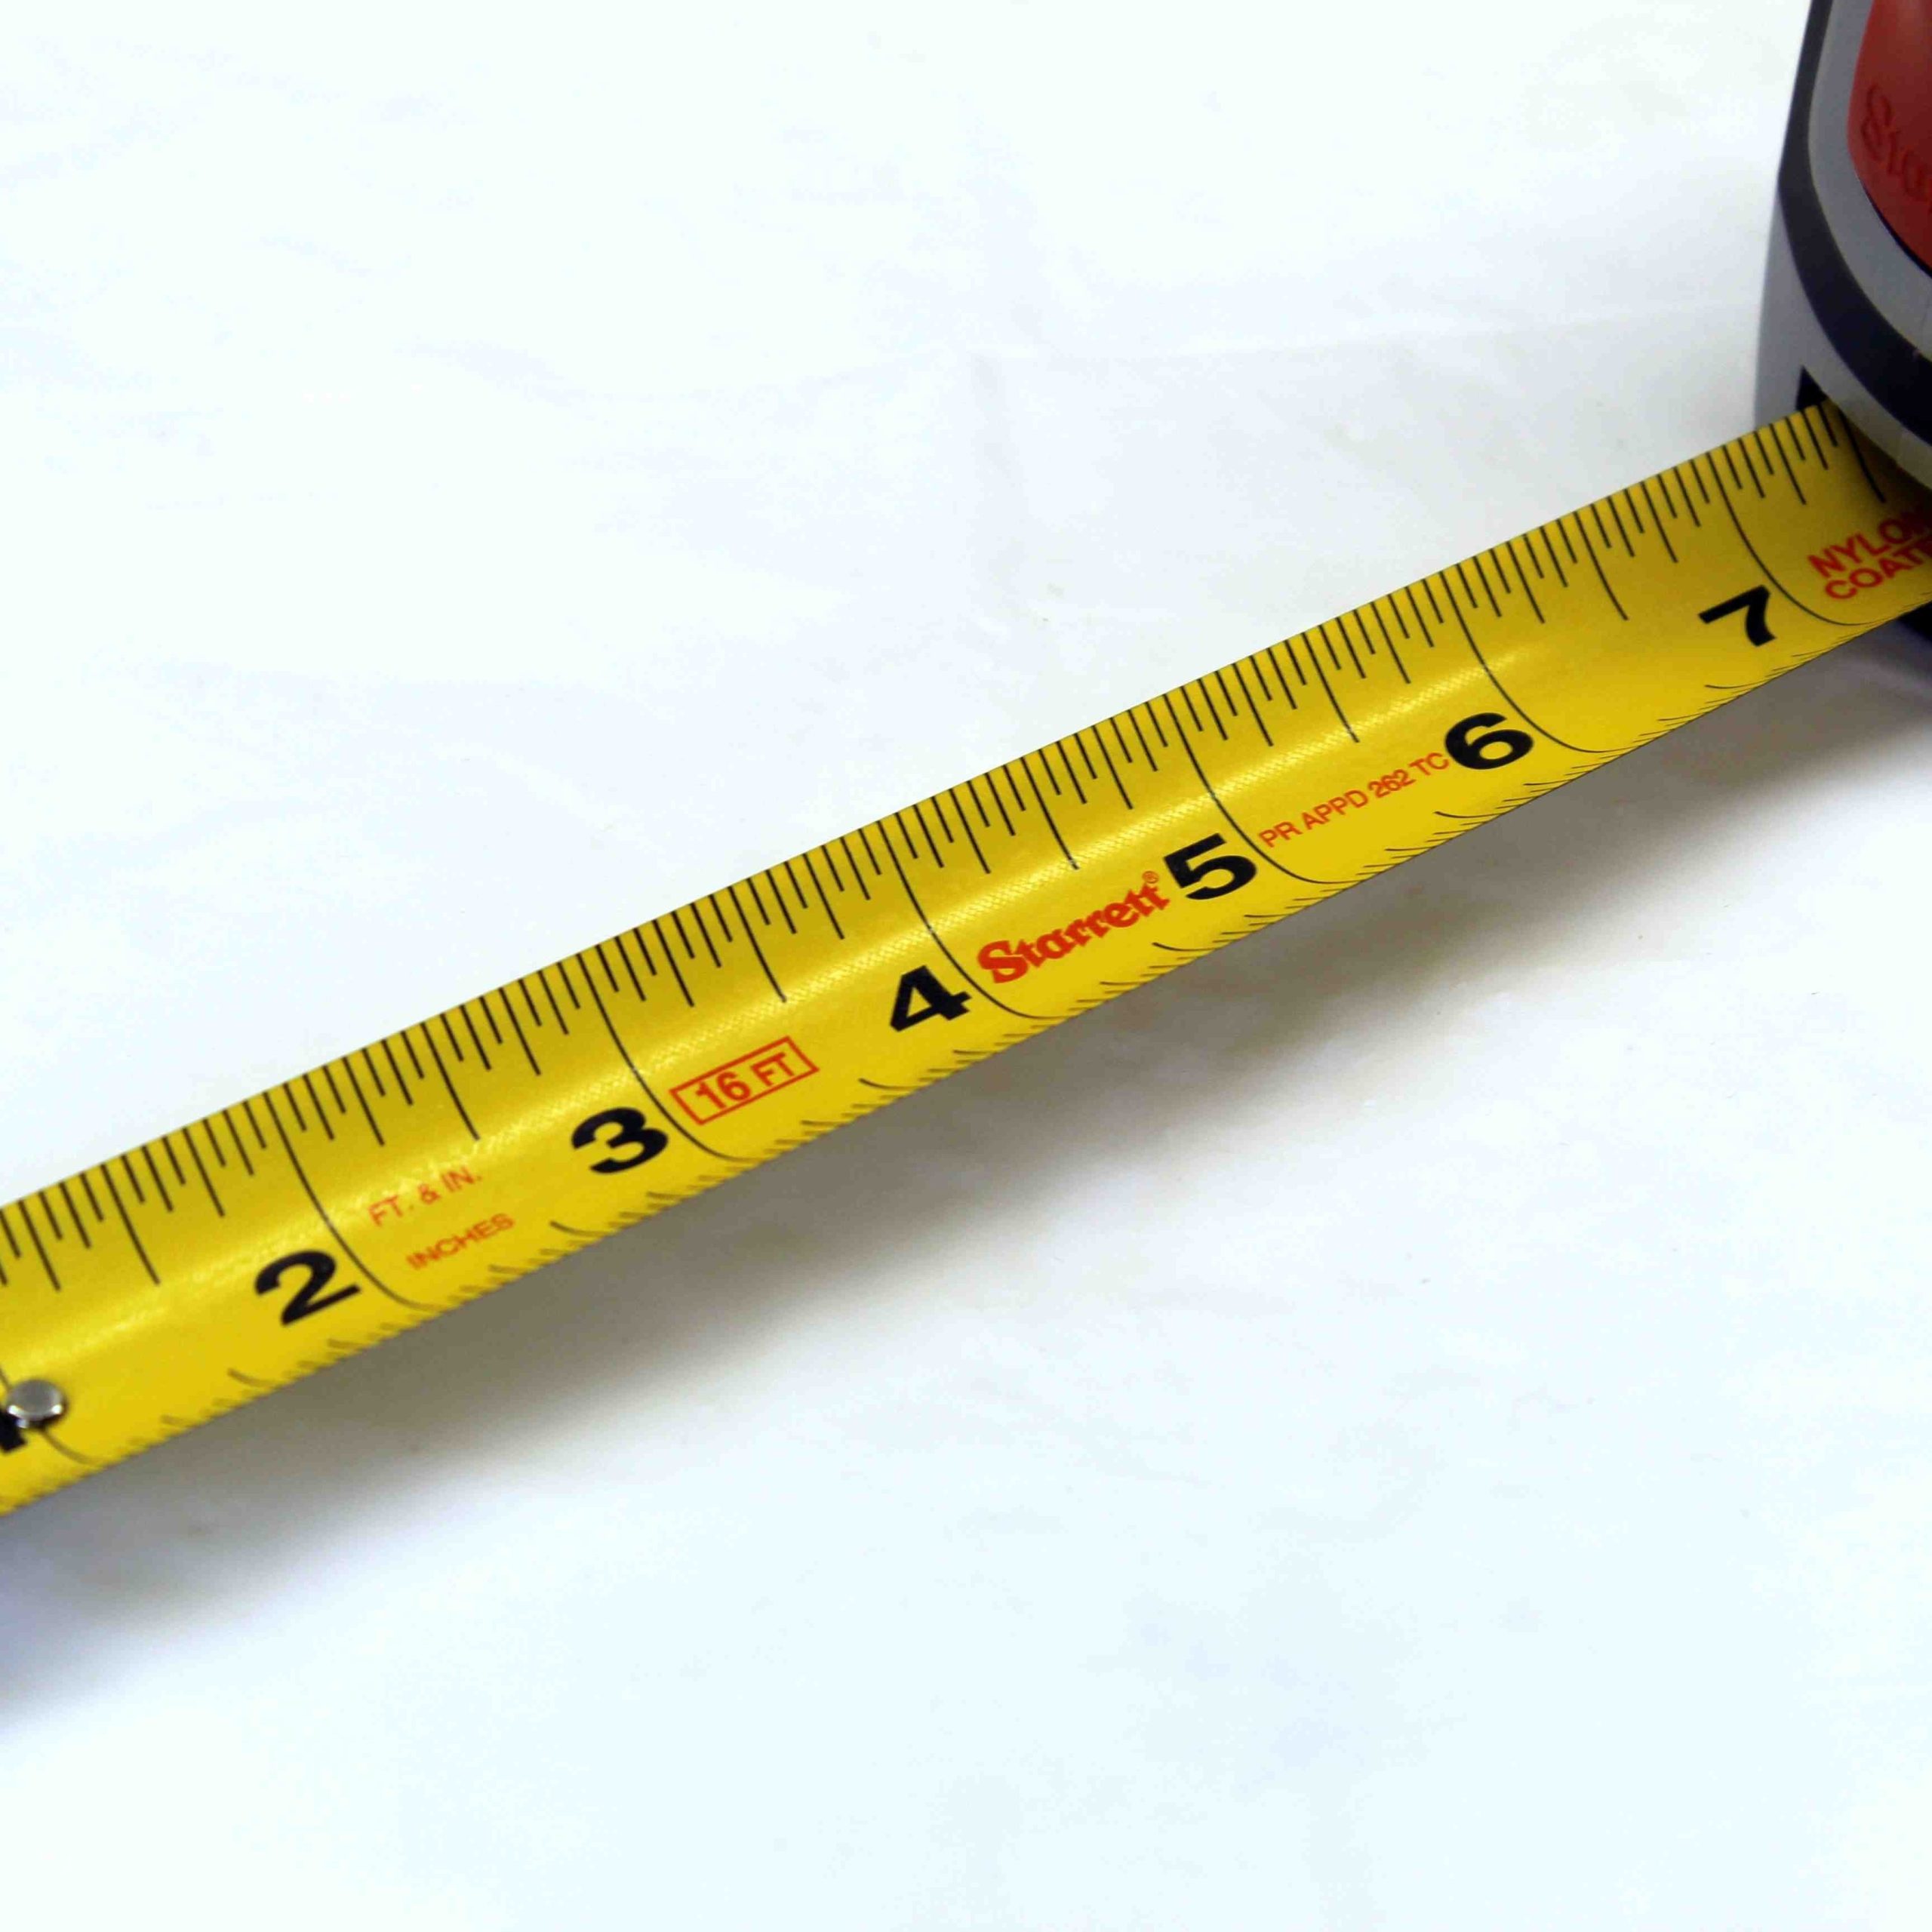
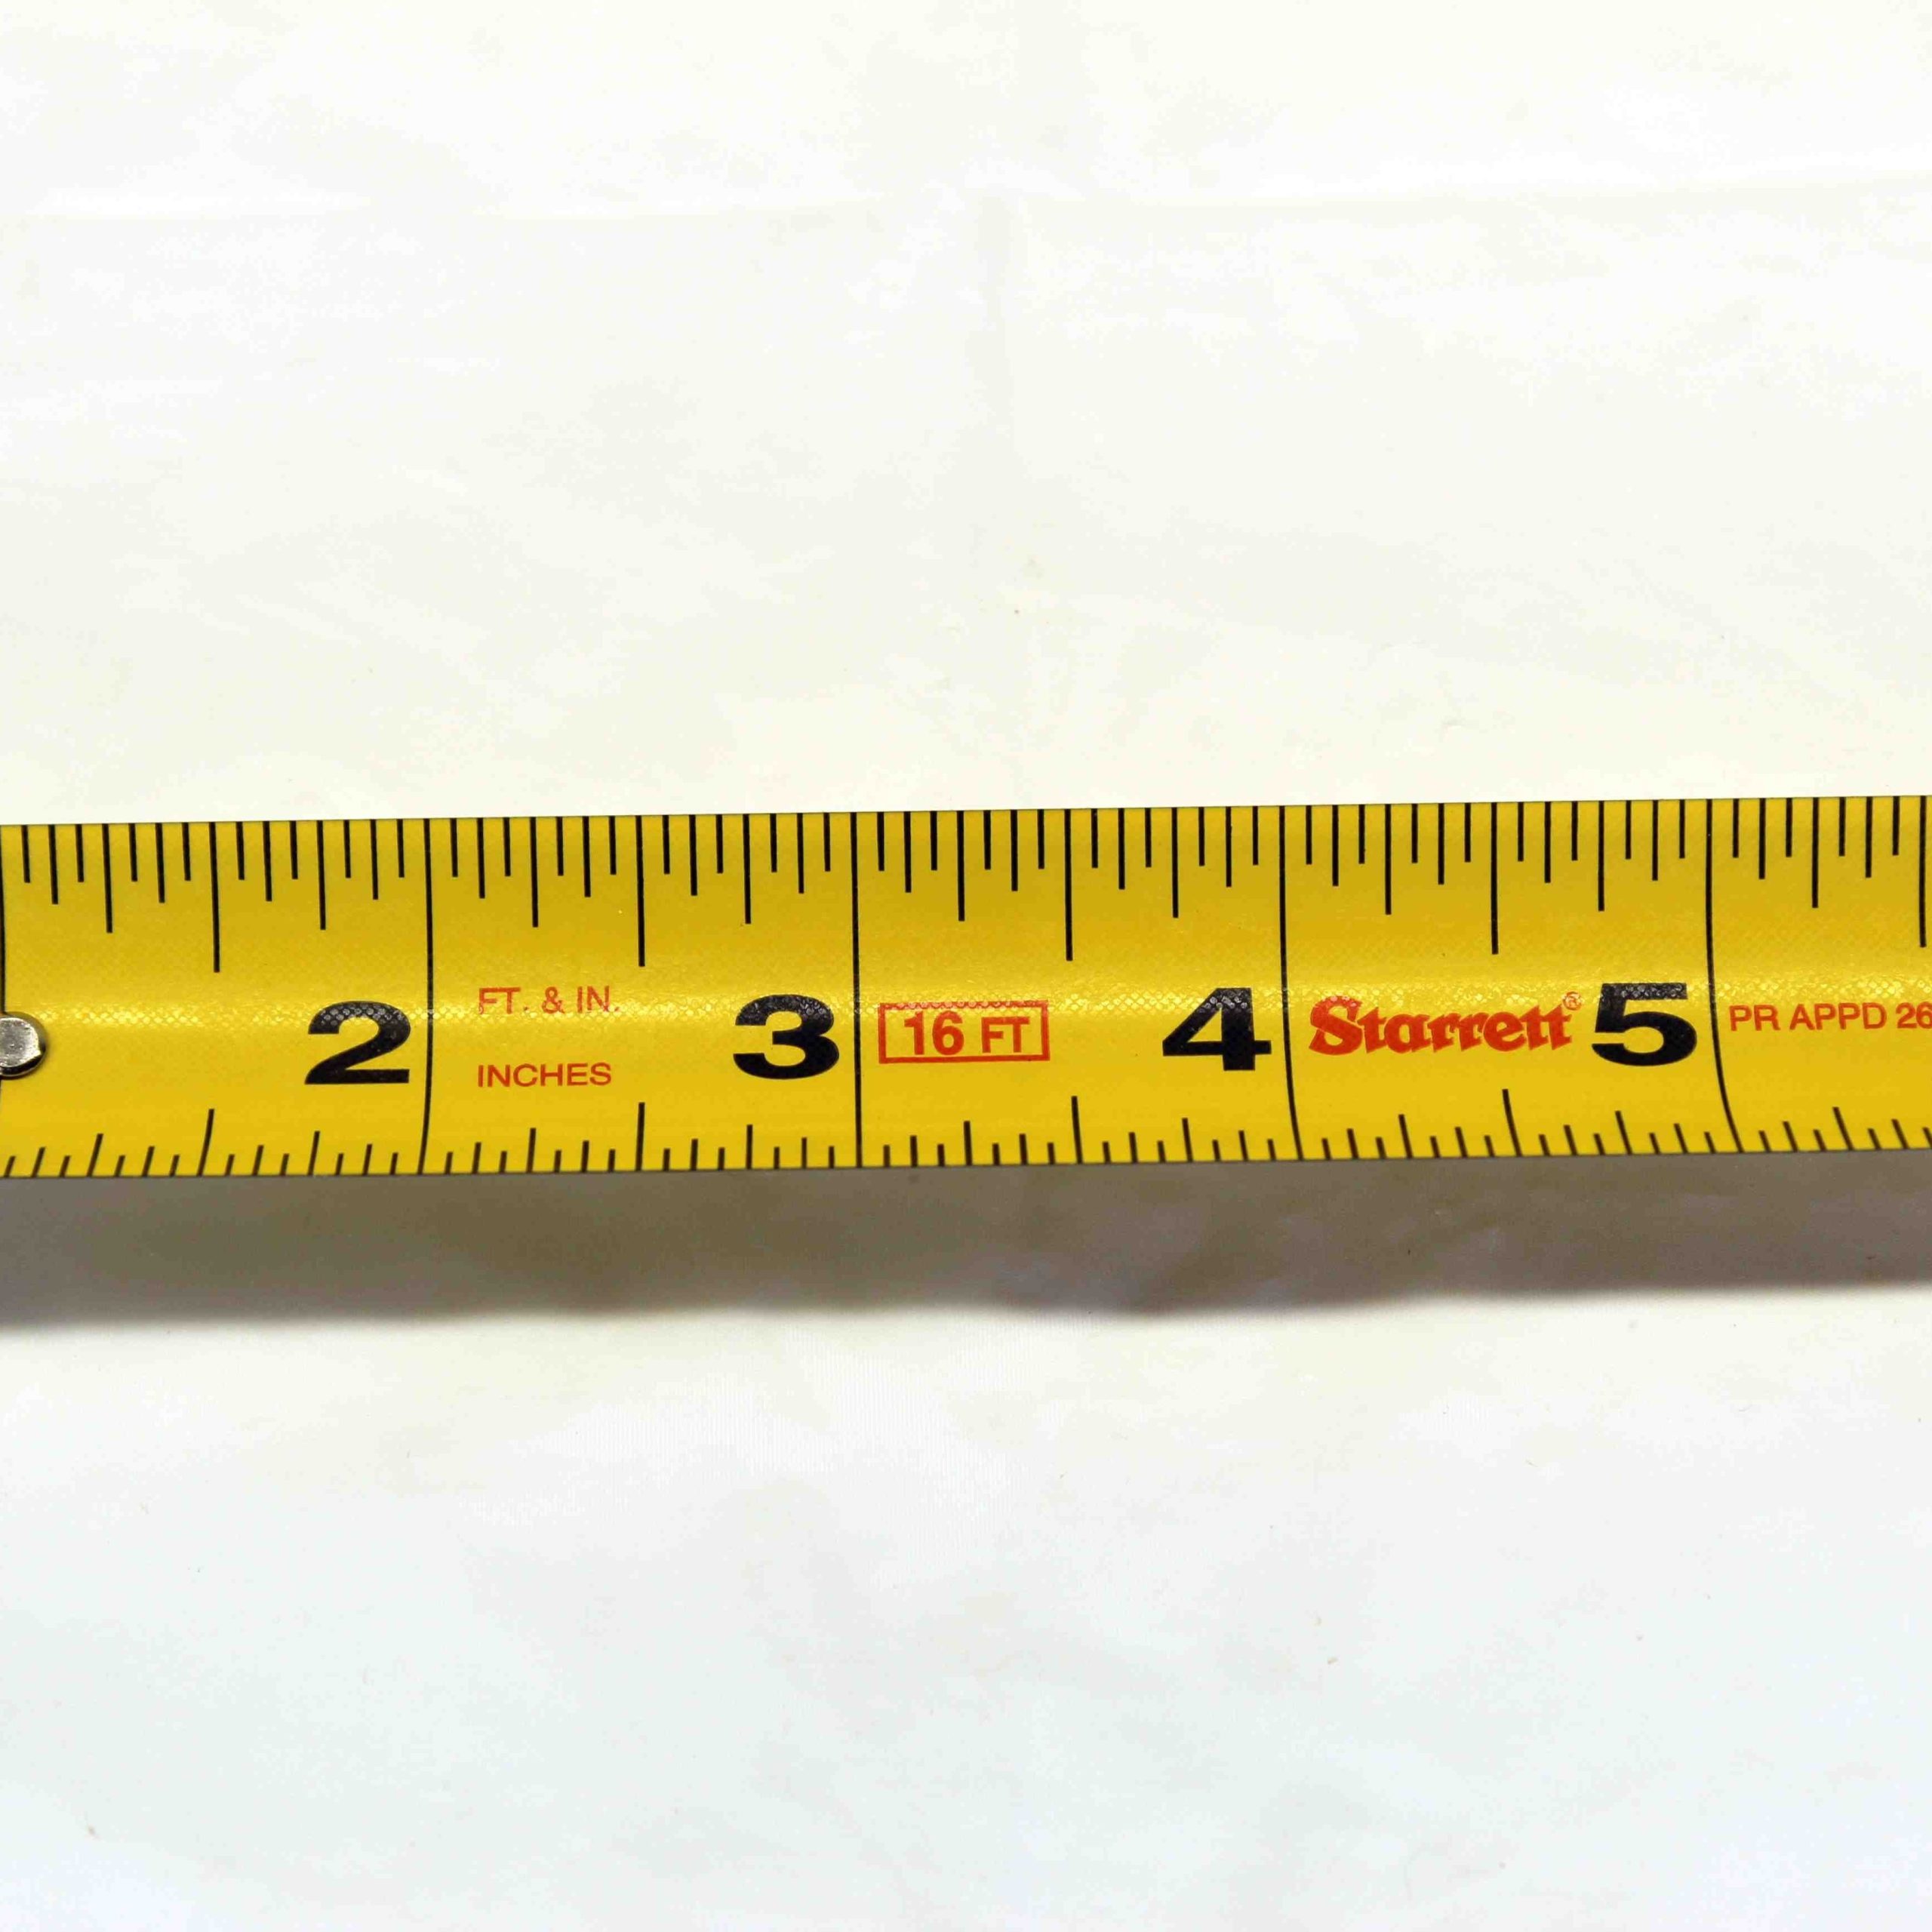
Start by locating the inch marks. They are the longest lines, labeled with numbers. Between each inch, shorter lines divide the space.
The second-longest line marks the half-inch point. It sits exactly in the middle. Then come quarter-inch marks. These are shorter than halves but longer than smaller divisions.
Next are the eighth-inch lines. They fall between quarters and halves. Finally, the shortest lines represent 1/16 of an inch. There are 16 of them per inch.
To read a measurement, find the last full inch. Then count the number of small lines past it. For example, if the mark lands on the fifth short line after the 3-inch mark, it reads 3 and 5/16 inches.
Some tapes include red diamonds every 16 inches. These help locate wall studs. The distance between diamonds equals standard stud spacing.
Practice reading different points. Close one eye and sight directly at the mark. This avoids parallax errors.
Use a pencil to mark exactly on the line. Don’t guess or round up unless instructed.
Tips for Clearer Reading and Accuracy
Lighting plays a big role. Poor light makes small lines hard to see. Use a flashlight or headlamp when needed.
Clean the tape surface. Dust or grease blurs markings. Wipe it with a dry cloth before use.
Hold the tape straight. Angling distorts the view. Keep it flat against the material.
Retract slowly. Fast snapping wears out the blade. It can blur printed numbers over time.
Choose a high-contrast tape. Black numbers on yellow backgrounds are easiest to read. Avoid faded or worn models.
Use a magnifier if your eyesight is weak. Some tapes have built-in lenses. Others pair well with handheld tools.
Take your time. Rushing causes misreads. Double-check every measurement before cutting.
Types of Tape Measures and Their Markings
Not all tape measures are the same. Standard 25-foot contractor tapes show 1/16-inch marks clearly. These are most common in hardware stores.
Longer tapes, like 50 or 100 feet, may not include 1/16 divisions. They focus on feet and inches. Useful for large outdoor jobs.
Short retractable tapes (6–12 feet) often have finer detail. Ideal for cabinetry and furniture work. Compact size fits in tool belts.
Fiberglass tapes resist stretching. Used in surveying and engineering. Less common in homes.
Cloth tapes appear in tailoring. They show 1/8 and 1/16 marks. Flexible fabric conforms to curves.
Digital laser tapes estimate distance. They display results on screens. Still, physical tapes remain more trusted for 1/16 accuracy.
Magnetic tip tapes help in metal framing. The end sticks to steel studs. Keeps hands free during solo measuring.
Choosing the Right Tape for Your Needs
Carpenters need durable, long tapes. A 25-foot model with bold 1/16 lines works best. Look for reinforced hooks and clear print.
Homeowners doing small fixes can use 12-foot versions. Lightweight and easy to handle. Stores easily in drawers.
Crafters benefit from soft rulers. These lie flat on paper or fabric. Show both metric and fractional units.
Outdoor workers prefer weather-resistant blades. Coated metals resist rust. Numbers stay legible in wet conditions.
Check for anti-slip grips. Rubberized handles improve control. Prevent drops and injuries.
Ensure the hook moves correctly. It should slide slightly to account for its own thickness. This maintains accuracy whether inside or outside measuring.
Pick tapes with lifetime warranties. Brands like Stanley and Craftsman offer strong guarantees. Reflects confidence in quality.
 Common Uses of 1/16 on a Tape Measure
In woodworking, 1/16 on a tape measure supports joinery. Dado cuts, rabbets, and mortises need exact depth and width. A fraction off changes fit.
Framing crews use it for ledger placement. Floor joists attach based on precise spacing. 1/16 differences affect structural strength.
Plumbers measure pipe fittings closely. Threaded connections must align. Too long or short creates leaks.
Electricians route wires through walls. Outlet boxes sit at set heights. Often 12 or 16 inches from the floor. 1/16 accuracy ensures level installation.
HVAC technicians size ductwork carefully. Panels connect with flanges. Gaps reduce airflow efficiency.
Quilters cut squares and strips using rotary cutters and rulers. These rulers are marked in 1/16. Ensures pattern continuity.
Metal fabricators build frames and enclosures. Lasers cut materials to size. Manual checks still use tape measures.
Even gardeners use it. Raised beds and trellises need square corners. Diagonal checks reveal 1/16 differences.
How Different Trades Depend on Fine Measurements
Cabinetmakers spend hours sanding and fitting. A drawer front that’s 1/16 too wide won’t close. Precision saves labor.
Flooring installers snap chalk lines based on 1/16 readings. Off-grid starts lead to slivers at the far wall.
Drywall hangers measure stud locations. Sheets must end on supports. Misplaced cuts waste material.
Painters measure from corners to hang artwork. Gallery walls look professional when spaced evenly.
DIYers building decks check beam levels. A 1/16 slope over ten feet affects water runoff.
Tilers lay spacers using 1/16 rules. Uniform grout lines enhance appearance.
Fence builders align posts. A slight lean accumulates over distance. Ends look crooked.
Roofers measure rafters and trusses. Snow load and drainage depend on correct pitch and length.
 Frequently Asked Questions
What does 1/16 look like on a tape? It’s the shortest line between inch marks. There are 16 per inch.
Is 1/16 the smallest marking? Most tapes stop there. Some specialty rulers go to 1/32.
How do I write 1/16 in decimal? It equals 0.0625 inches. Useful for calculators.
Can I round 1/16 measurements? Only if allowed. In finish work, always follow exact values.
Why are some 1/16 lines missing? On longer tapes, they may skip for clarity. Stick to shorter models for detail.
Does temperature affect the tape? Metal expands in heat. Can stretch slightly. Work in stable conditions.
Should I trust laser tapes for 1/16? Not always. They estimate. Use real tapes for true precision.
 Final Thoughts
Understanding 1/16 on a tape measure is a fundamental skill for anyone who builds, repairs, or creates. It separates careful work from guesswork. With practice, reading these tiny lines becomes second nature.
Additionally, using this knowledge consistently leads to better results. Projects fit together smoothly. Materials are used efficiently. Confidence grows with each accurate cut.
As tools evolve, the tape measure remains a staple. Its simplicity and reliability endure. By mastering 1/16 on a tape measure, you ensure your work meets the highest standards. So grab your tape, take your time, and measure with pride.